Loading...
Loading...
Loading...
Loading...
Loading...
Loading...
Loading...
Loading...
Loading...
Loading...
Loading...
Loading...
Loading...
Loading...
Loading...
Loading...
Loading...
Loading...
Loading...
Loading...
Loading...
Loading...
Loading...
Loading...
Loading...
Loading...
Loading...
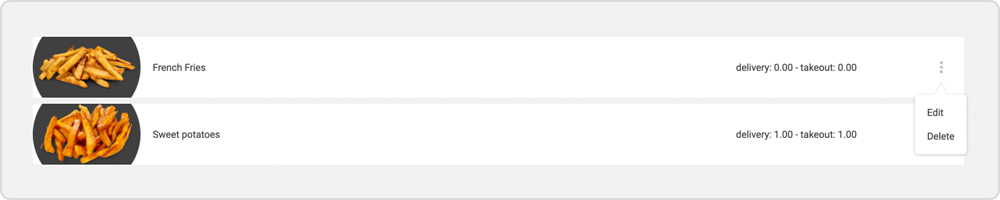
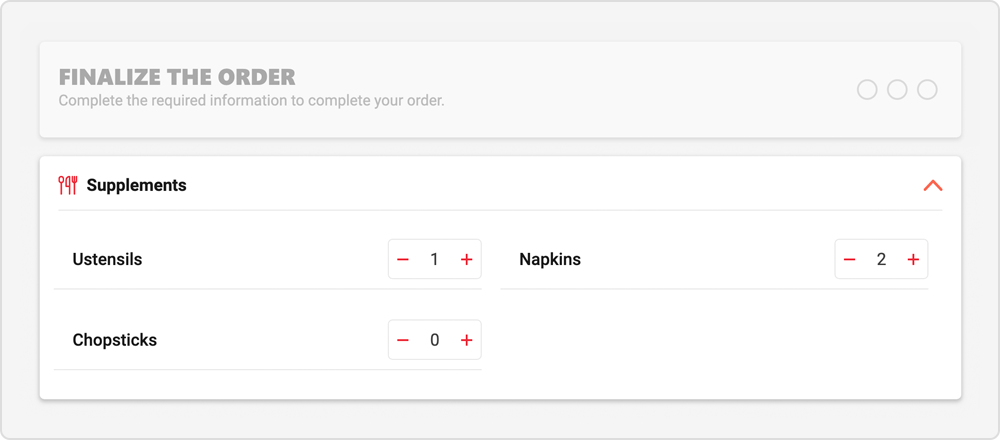
A supplement is an additional and free product that a customer can add to their order at the end of the process.
Example: Utensils, towels, etc.
Access the supplements management page through the Inventory tab for the desired branch.
Click Create new supplement .
Give your supplement a name and check the box if the supplement can have a quantity.
Click Save to create your supplement and return to the supplements management page.
To edit or delete a supplement, click the edit button for the desired supplement and choose the appropriate action.
Categories
A category is made up of products that are similar or correspond to a similar typ...
Modifiers
Modifierss are particular ingredients that can be selected when the user wants to...
Choice products
Choice products are additional products or ingredients with which a product must ...
Clone inventory
Clone inventory allows you to copy the entire inventory from one branch to anothe...
Leverage your ordering service with personalized marketing campaigns.
In the inventory section of the navigation bar, go to Menu Display.
Then click on the Online catalog. This catalog contains your online ordering menu.
Click on the desired category and, while keeping the mouse button pressed, drag the category to the desired location.
Open a category by clicking on it.
To make a product invisible, uncheck this product. Note that categories with no visible product will not be displayed on your online menu.
To move a product, click on the desired product and, while keeping the mouse button pressed, drag the product to the desired location in its category.
Click on Save when you're done with your changes.
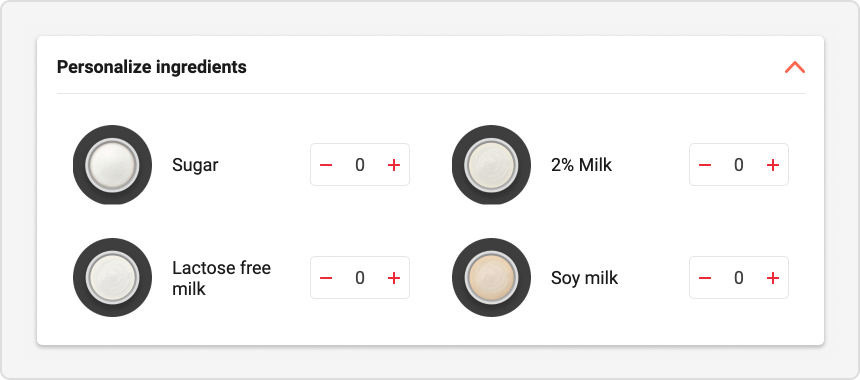
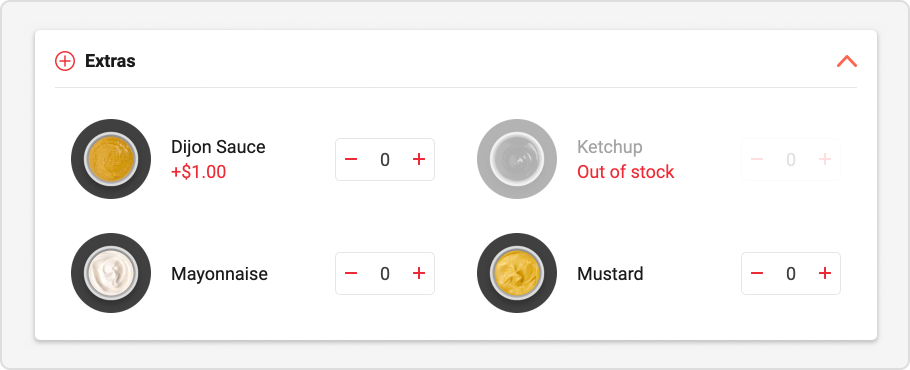
Modifiers groups are associations of different modifiers under the same group. They are used when you want to combine several modifiers of the same type at the same time for a particular product.
Example: Ketchup, Mustard and Mayonnaise in the Extra Sauces Group.
Modifiers groups are accessible in the Selection and remarks tab in the Inventory section of a branch's navigation menu.
From the Modifiers page, you can access individual modifiers as well as modifiers groups.
Click New modifiers group .
Enter the internal name (name which will appear only in the iShopFood management interface) and the name for display (name which will appear on the command interfaces).
Add the desired modifiers by selecting them from the list on the left.
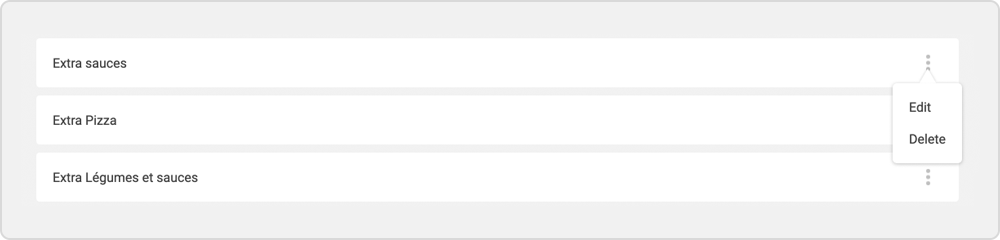
Click on the edit button to the right of the desired group.
Choose Edit or Delete .
Once the changes are completed, click Save to and return to the modifiers group management page.
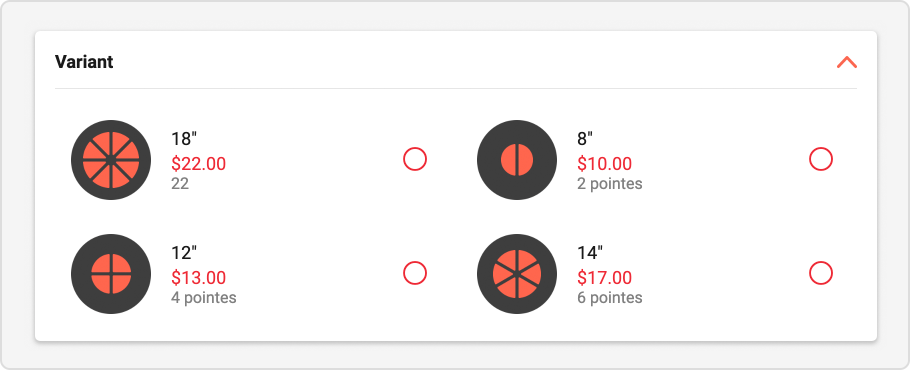
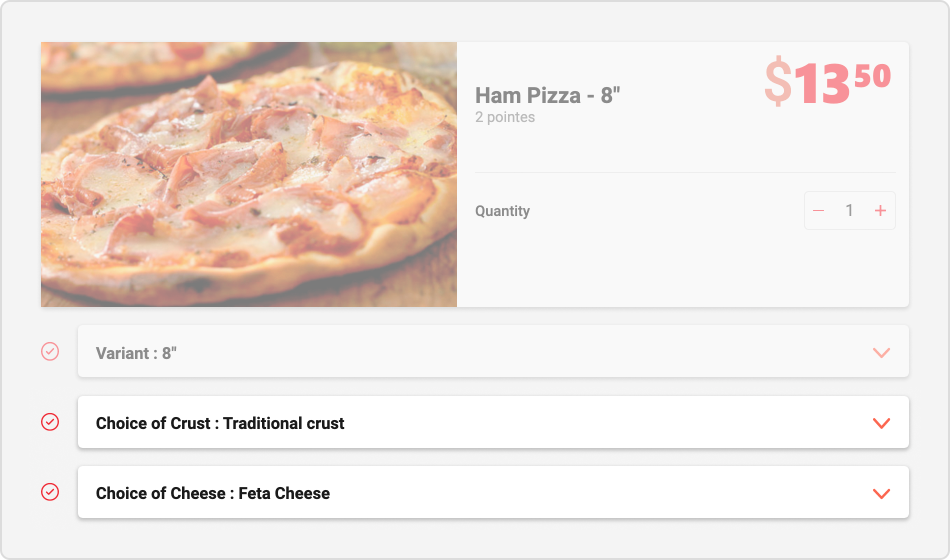
A product can be offered in several formats: Starter / Meal, Quantities, etc. For each format, we can create a variant for the same product which will be available on the page of the selected product. A price and an image can be assigned to the variant. A variant must be selected by the user for the product to be added to the current order.
Example: Starter or Main course formats.
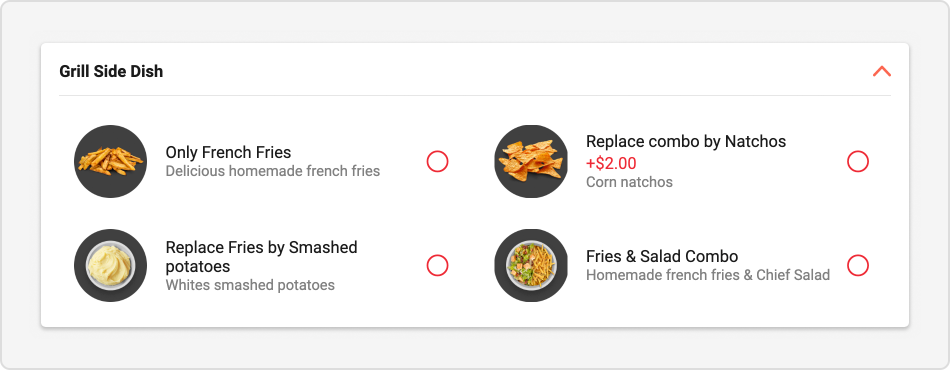
Choice products are additional products or ingredients with which a product must be ordered. It can be a side dish (salad, fries, etc.), a type of cooking (rare, well done, etc.), a flavor (apples, oranges, etc.), a brand (Pepsi, Crush, 7Up, etc.), etc.
A prize can be assigned to a choice product. Unlike modifiers, a choice product must be selected by the user for the product to be added to the order.
Administer the parameters of your online ordering platform.
The Quick Config page gives you access to useful basic setups for managing the branch of your choice. These configurations are mainly used to resolve urgent problems related to the online ordering interface.
The Quick Config page is accessible via the navigation bar in the management page of the desired branch. On the quick setup page, select the desired setup from the drop-down menu.
Menu display
Categories
Products
Product variants
Modifiers
Modifiers groups
Choice products
Combos
Choice groups
Clone inventory
Supplements
Hierarchy and menu creation
Clone inventory allows you to copy the entire inventory from one branch to another within the same company.
To access the Clone inventory page, go to the branch management page for the desired company and click Clone Inventory in the Admin tab of the navigation bar.
In the To copy to field, select the branch office that will receive the copied inventory.
In the From field, select the branch that has the inventory to copy.
Click Copy to clone the inventory of the desired branch.
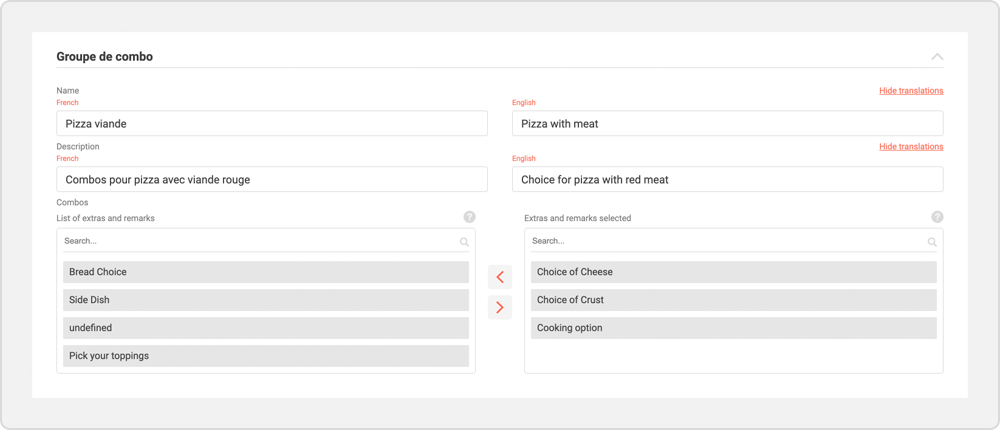
Combos
Combos are made up of one or more choice products. A choice product must be selec...
Choice products
Choice products are additional products or ingredients with which a product must ...
Menu display
The menu display is a tool for changing the order and visibility of categories an...
Modifiers groups
Modifiers groups are associations of different modifiers under the same group. Th...
If your inventory is out of stock, you can use the Quick config page to prevent your products and variations from being ordered. This out of stock may or may not have a fixed period, depending on your needs. The Quick config page allows you to change these settings without having to access each product's setup page.
Select the Snooze product configuration from the drop-down menu for Quick configs.
Use the Product field to search and find the desired product or variant.
Select the start and end dates for the out of stock.
Select a timer that will count down before activating the Out of Stock feature for the selected product or variant.
Click Save to add this product to your backorder list.
Remove a product from the list of out-of-stock products by clicking the X button for that product.
Emergency closure prevents customers from ordering through your online ordering interface without disabling ordering. Your menu also remains accessible for consultation by users.
Select the Emergency closure configuration from the drop-down menu for quick configurations.
Activate emergency closure by choosing Yes from the drop-down menu.
If necessary, add a message to inform your customers of the reasons for the closure.
Click Save to activate the configuration.
The Bypass POS feature allows you to turn off synchronization between your online ordering service and your existing POS system. If there is no synchronization, you will receive online orders via email.
Select the Bypass POS configuration from the drop-down menu for quick configurations.
Activate the Bypass POS by choosing Yes from the drop-down menu.
Add the email address through which orders will be received. You can put more than one email address.
Click Save to activate the configuration.
The quick config page allows you to change the availability times for the order types on your online ordering platform. For example, on-site orders can end at 8:00 p.m. while delivery orders end at 11:00 p.m. The Quick Config page allows you to change these settings without having to access the configuration page for each type of control.
Select the Change opening hours configuration from the drop-down menu in the quick configs.
For each type of order, add if necessary a time slot for one day by clicking on the + button. You can add more than one time slot for the same day.
Select the hours of operation from the drop-down menus.
Click on Save to finalize the configuration.
Use the arrows to add them to the list on the right, to the current group.
Click on Save when you are finished to finalize the creation of your modifiers group and return to the management page.
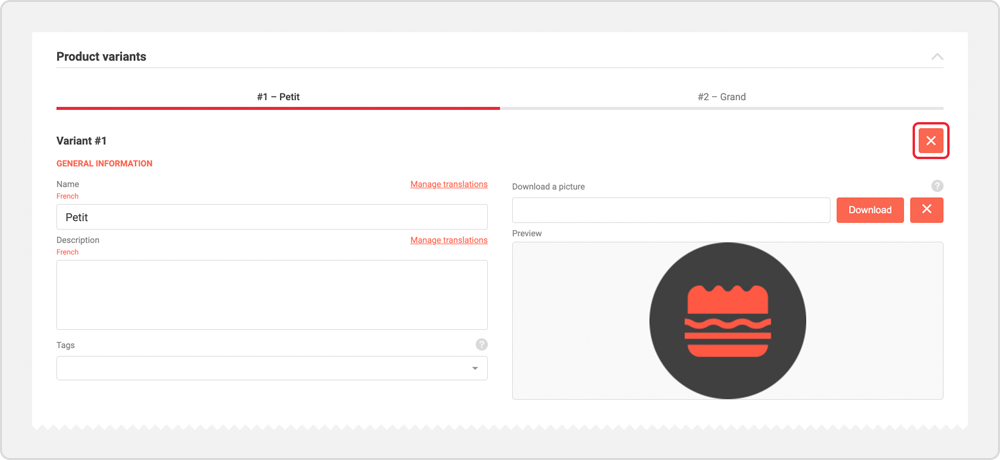
On a product page, go to the Product variants section.
Click on Add a variant.
Fill out the form with the necessary information, payment information and a representative photo or image of the variant (jpg or png, 200 x 200 pixels).
Add additional variations by clicking Add a variant again , if necessary.
Click Save once the variants have been created to save all the changes made to the product.
On a product page, go to the Product variants section.
Click on the desired variant.
In the section Modifiers and combo, select the desired option and click on the arrow to send it in the right section. This will activate this option for the desired variant.
Click Save once the variants have been created to save all the changes made to the product.
To modify a variant, go to the Product variants section.
Select the variant you want to modify and edit the desired information.
To delete the variant, click the X button at the top right of the desired variant.
Click Save once the variants have been modified or deleted to save all the changes made to the product and return to the product management page.
You can also access them by going through the Category tab in the same section of the menu and see products specific to the selected category.
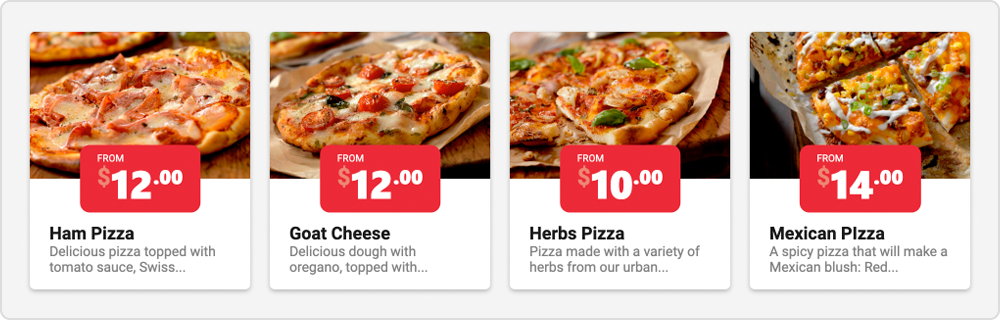
Click New Product .
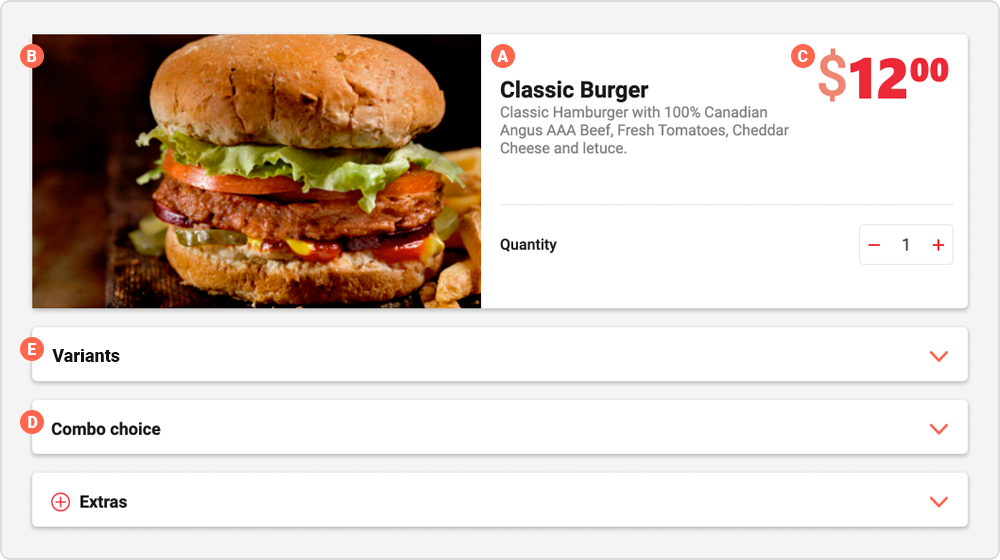
Fill out the forms with the necessary information and add an image as needed (jpg or png, 600 x 400 pixels). A. General Information - Enter descriptive product information in this section (name, description, photo). B. Classification - Classification is the category to which a product belongs. Note that if you do not assign a category to the product, the product will be hidden from users. C. Payment Information - You can enter the price of the product according to the type of receipt (if required). It is also in this section that you can synchronize the product with your existing POS system and adjust the applicability of the product to certain functions and promotions in the ordering interface. D. Modifiers and Combo - In this section you can select the Extras, Notes and Combo that will be applicable to the product. Select the desired item and click on the arrows to send it to the right section and activate it. E. Product Variants - To offer your product in multiple available formats, you can create variations that will have all of their information, pricing, photos, and POS sync details. Enter the requested information in order to create a variant and select the extras, remarks and combos that apply to it.
To add a French version, click Manage translations .
Click on Save when you're done creating your product.
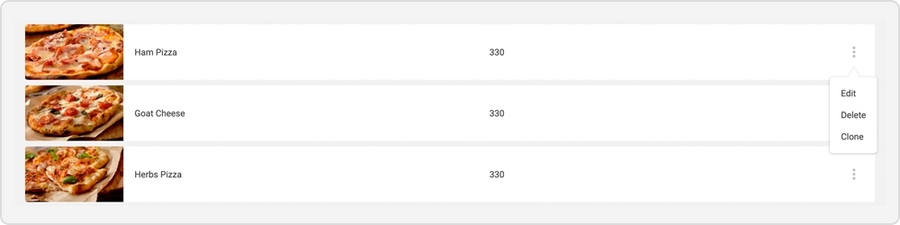
Click the right edit button of a product to modify, delete, or clone a product. Note that you can make a product inaccessible without having to delete it:
On the product management page, click on the desired product.
Check the Hide this product box in the Classification section.
Click on Save .
The choice products and combos are accessible in the Selection and remarks tab in the Inventory section of a branch's navigation menu.
The Combos page also gives you access to combo products as well as combo groups.
Click New combo item .
Enter the information needed to create the choice product, including name, price, POS ID, etc.
Add modifiers to the choice product in the Extras Groups section, if desired. Select the group and use the arrows to activate the groups of modifiers.
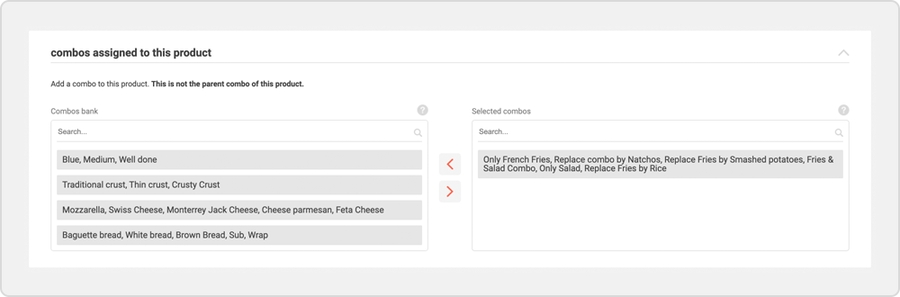
Assign a combo to your choice product in the Combos section assigned to that choice product.
Click on Save once the necessary information fields have been filled in to create your choice product.
You can assign one or more combos to a choice product. Thus, when a user chooses a choice product during an order, they will have access to the combos linked to this choice product.
Example: The user selects fries to accompany his burger, and must then choose a sauce to accompany their fries.
Select the desired choice product in the Choice products management page.
In the Combos section, select the desired combo in the combo bank and move it to the selected combos using the arrows.
Click Save once your changes are complete to return to the choice product management page.
Click on the edit button to the right of the desired choice product.
Click Edit to reach the choice product edit page.
Click Save once your changes are complete to return to the choice product management page.
To permanently delete the choice product, click on the edit button and then on Delete .
Note that you can hide a choice product without deleting it by not assigning it to any combo.
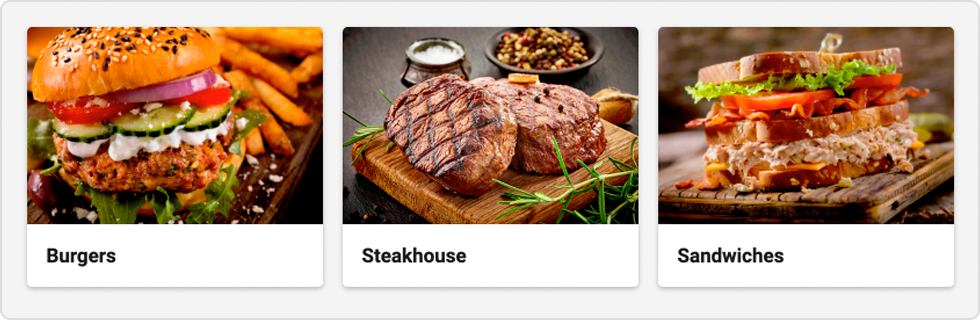
A category is made up of products that are similar or correspond to a similar type. Categories are the first to be seen when the user arrives at the restaurant menu.
Example: Starters, Pasta, Grills, Desserts, Drinks, etc.
Click New Category .
Fill out the forms with the necessary information and add an image as needed (jpg or png, 600 x 400 pixels).
To add a French version, click Manage translations .
Click Save to return to the category management page.
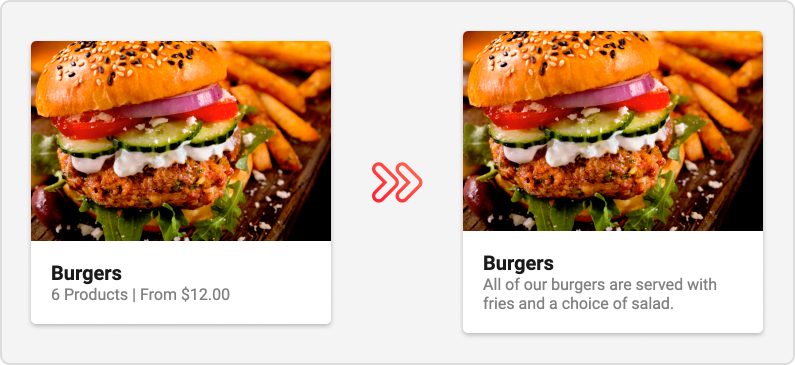
Usually, categories are displayed with the number of products contained as well as the minimum price for a product. You can, however, add and display a description for one or more of your categories.
Example: All our dishes are served with fries and a choice of salad.
On the category creation / modification page, enter the desired description in the Description field.
Click on Save.
If you add and display a category description, the product numbers and minimum prices will no longer be displayed for all categories.
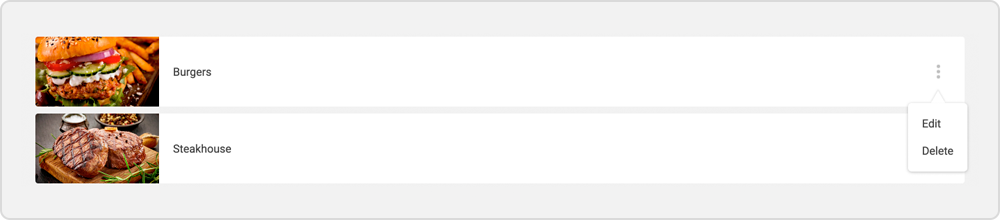
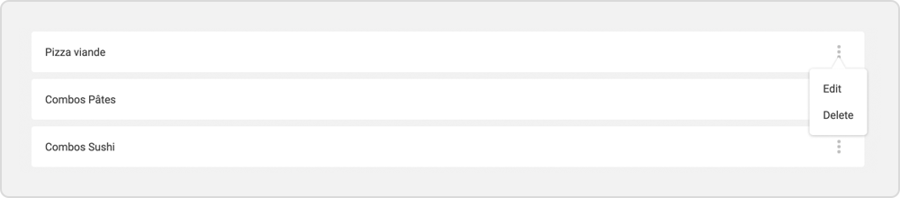
Click the right edit button of a category to modify or delete a category.
Note that deleting a category will not remove the products in the deleted category; the products will end up without category and will not be visible on the ordering platform.
Click Save to return to the category management page.
In the information page of a category, go to the Products section of the category.
Select the desired products and use the arrows in the center of the section to place or remove a product for the current category.
Click Save to return to the category management page.
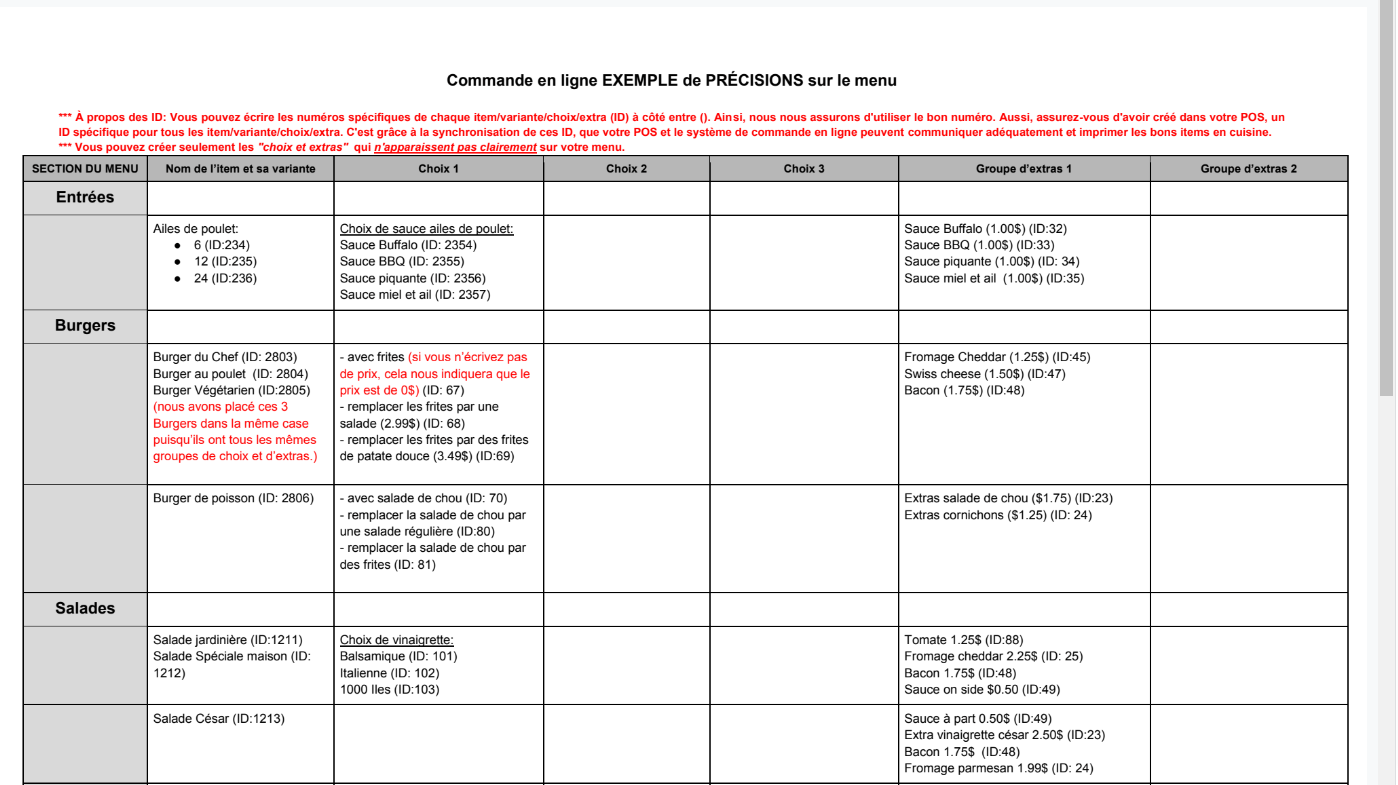
In order to ensure a menu which will be coherent with your POS system, it will have to be composed with a certain hierarchy and "interlocking" which is at the base of the iShopfood structure. This structure will ensure good navigation in the categories, and will allow the customer to choose his extras, combo and variant for different products, in different categories.
A product usually has variations, extras, and combos. These 3 quite distinct things. The extras are added to the products, and you can bundle the extras together to save a considerable amount of time.
In the event of high traffic or lack of personnel, you can adapt the minimum preparation times for your products in order to inform customers of the order receipt time. The Quick Config page allows you to change these settings without having to access the configuration page for each type of control.
Select the
For each type of order, enter the minimum preparation time during which you do not wish to receive an order (in minutes).
Click Save to activate the configuration.
Quick config
Emergency closure
Bypass POS
Preparation time
Opening hours
Snooze product
Note that only company administrators can enable the display of category descriptions
Modifiers are accessible in the Selection and remarks tab in the Inventory Management section of a branch's navigation menu.
From the Modifiers page, you can access individual modifiers as well as groups of modifiers.
Click on Create new modifier.
Fill in the necessary information and add a photo if desired (200 x 200 pixels).
If it's a paid extra, you can add a price as well as a POS sync ID.
Click on Save once the creation of the modifier is completed.
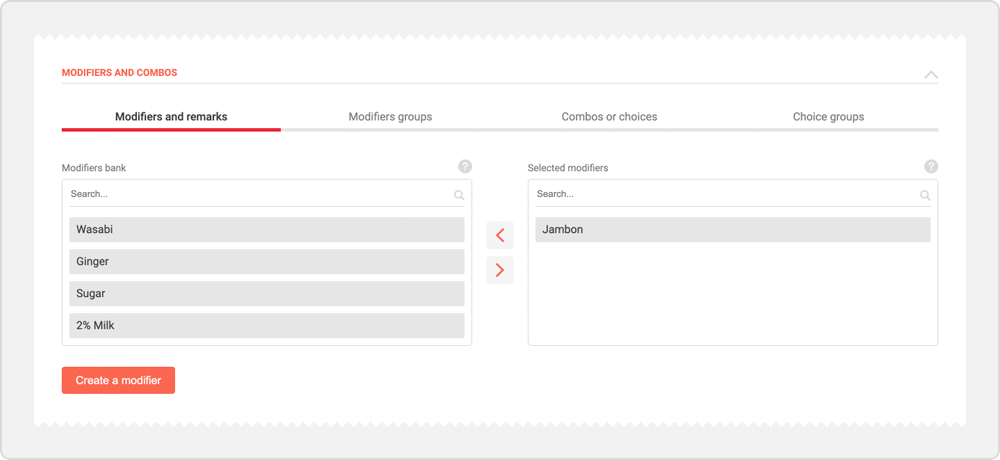
On the product management page, click on the desired product.
In the Modifiers and combos section, choose Modifiers and remarks.
Use the Modifiers and remarks bank to choose the desired modifier. Then click on the arrows to bring the selected modifiers to the product's modifiers bank. Use the search box to easily find the modifier you want.
If necessary, you can create a modifier directly on the product configuration page.
Click Save when modifiers are assigned and changes are complete.
To modify or delete a modifier, click on the edit button to the right of the desired extra.
Click Edit or Delete .
Once the changes are completed, click on Save to return to the modifiers management page.
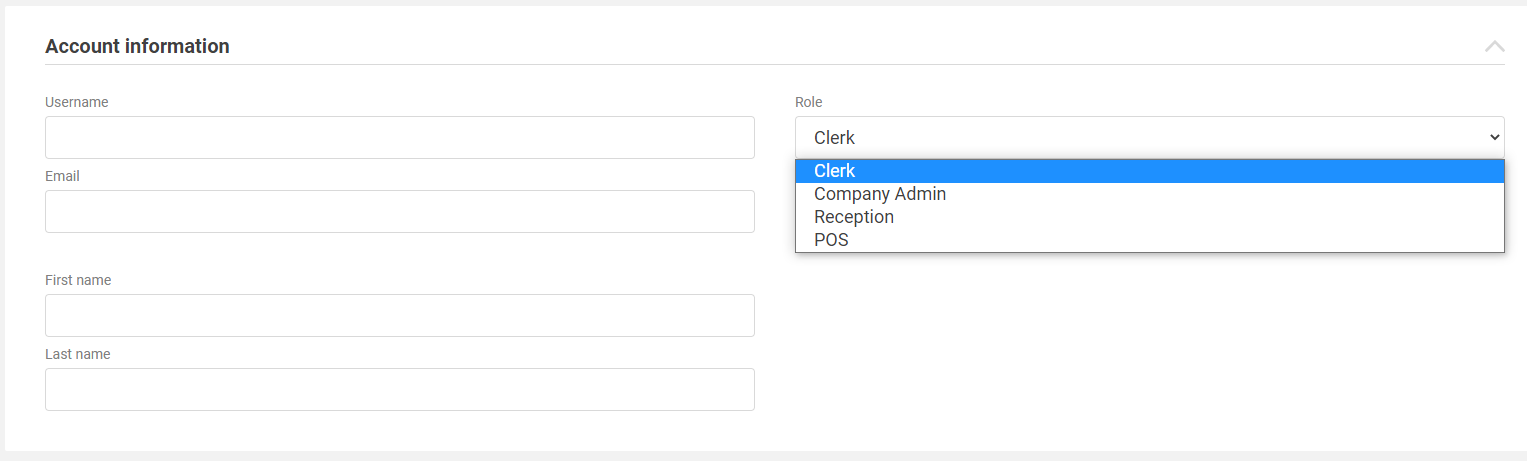
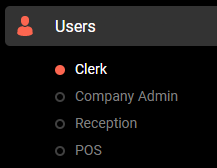
Create a user with the desired authorization level: Employees (Quick configuration: ON), Compagny Admin (Full navigation menu), Reception (Quick configuration: OFF), POS (external POS from the IshopFood backend, this mode is very specific .)
Enter the requested information, include a password and the user's role. Note that the chosen role affects the permissions available to the created user.
Once the fields are filled in, click on Save to create your new user.
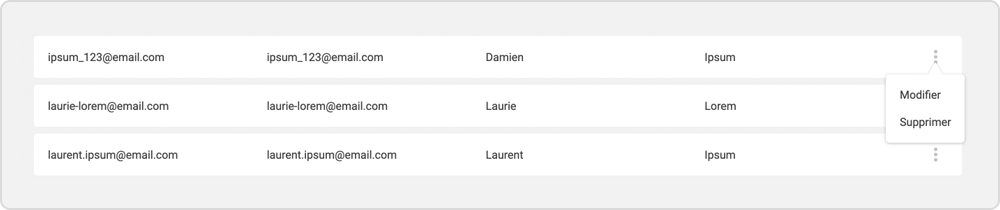
In the user management page, click on the edit icon of the desired user.
Choose the desired action.
Once the changes are made, click on Save to return to the user management page.
Each user role has specific configuration permissions. Changing permissions affects all users of the selected role.
To reach the permissions configuration page, choose a branch, then in the navigation bar, click Permissions on the Configurations tab.
Choose a role to edit, then select the permissions enabled for that role.
Click Save when your changes are complete.
The Choice groups page also gives you access to choice products as well as combos.
Click on New choice group.
Enter the internal name (name which will appear only in the iShopFood management interface) and the name for display (name which will appear on the command interfaces).
Add the desired combos by selecting them from the list on the left.
Use the arrows to add them to the list on the right, to the current group.
Click on Save to return to the choice group management page.
In the Choices groups management page, click on the desired combo group or create a new choice group, according to your needs.
Give your choice group a name and description.
Add a french version to your name and description by clicking Manage translations.
Select the desired combos from the combo bank on the left. Use the search box as needed.
Use the arrows in the center to move the selected combos to the right to assign them to the current choice group.
Click on Save to finalize your modifications and return to the choice groups management page.
Click on the edit button to the right of the desired choice group.
Click Edit to reach the combo group edit page.
Click on Save once your changes are complete to return to the choice groups management page.
To permanently delete the choice group, click on the edit button and then on Delete .
Create a user with the desired authorization level: Employees (Quick configuration: ON), Compagny Admin (Full navigation menu), Reception (Quick configuration: OFF), POS (external POS from the IshopFood backend, this mode is very specific .)
Enter the requested information, include a password and the user's role. Note that the chosen role affects the permissions available to the created user.
Once the fields are filled in, click on Save to create your new user.
In the user management page, click on the edit icon of the desired user.
Choose the desired action.
Once the changes are made, click on Save to return to the user management page.
Each user role has specific configuration permissions. Changing permissions affects all users of the selected role.
To reach the permissions configuration page, choose a branch, then in the navigation bar, click Permissions on the Configurations tab.
Choose a role to edit, then select the permissions enabled for that role.
Click Save when your changes are complete.
You can create promotions that will apply to the desired products. Several types of promotions are available (2 for 1, discounts, hidden products, etc.) and terms of use apply.
On the promotion management page, click New promotion . Give your promotion a name and then select the type of promotion.
Normal - A reduction applies to the invoice total or to a product. X for Y - Allow the purchase of a certain number of products for a reduced number ( Example: 2 for 1 ) Mobile only - A discount applies to the invoice total or to a product, but only to the mobile order. When you buy - This type of promotion allows you to apply any type of promotion following the addition of a particular product to the invoice. ( Example: Get 5% off your bill with the purchase of a regular burger. )
Enter the information requested to complete the promotion creation.
Add a French version to the requested information by clicking on Manage translations .
Continue to create your promotion by applying the number of uses allowed.
Then select how the promotion will be applied: automatic or by entering a promotional code.
End the creation by applying a start and end date and link it to a promotion in your existing POS system.
Click Save to create your promotion.
Finally, perform a test to verify that your promotion meets your expectations.
Click the right edit button of a promotion to edit or delete a promotion.
Make your changes and click Save to return to the promotions management page.
Change the start and end dates to make the promotion inaccessible without removing it.
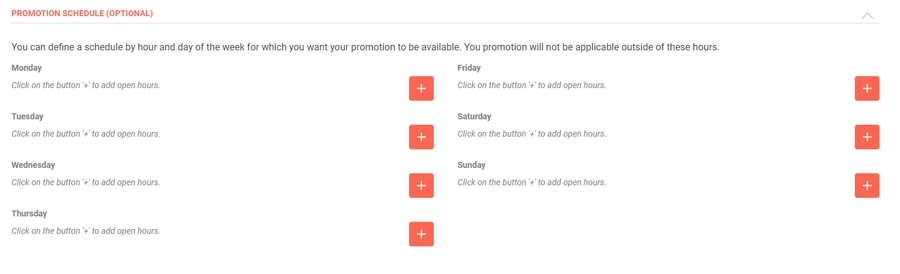
You can set a schedule per hour and day of the week for which you want your promotion to be available. Your promotion will not be applicable outside of these hours.
To add a schedule to your promotion in the relevant promotion, click on "Add a schedule
You can set a schedule per hour and day of the week for which you want your promotion to be available. Your promotion will not be applicable outside of these hours.
Promotional pop-up
The iShopFood promotional pop-up allows you to display your promotions in a perso...
Tags
Tags allow you to mark the products you want to include or exclude from your prom...
Schedules by category
If the categories in your menu have special times, you can program a display time...
Upsell
Upsell pop-ups allow you to suggest products to your customers. These pop-ups can...

Finally, perform a test to verify that your promotion meets your expectations.
The combos are accessible in the Combos or choices tab in the Inventory section of a branch's navigation menu.
The Combos page also gives you access to choices products as well as combo groups.
Click New combo item.
Enter the information needed to create the choice product, including name, price, POS ID, etc.
Add modifiers to the choice product in the Modifiers Groups section, if desired. Select the group and use the arrows to activate the groups of modifiers.
Assign a combo to your choice product in the Combos section assigned to that product.
Click on Save once the necessary information fields have been filled in to create your choice product.
Click on New combo .
Enter a name and choose whether the combo is optional or not and whether a default product is chosen automatically.
Add modifiers to the combo in the Modifiers Groups section, if desired. Select the group and use the arrows to activate the groups of modifiers.
Click on Save once the necessary information fields have been filled in to create your combo.
Choice groups are associations of several different combos, used to quickly associate these combos with a product or product type.
In the Choices groups management page, click on the desired combo group or create a new choice group, according to your needs.
Give your choice group a name and description.
Add a french version to your name and description by clicking Manage translations.
Select the desired combos from the combo bank on the left. Use the search box as needed.
Use the arrows in the center to move the selected combos to the right to assign them to the current choice group.
Click on Save to finalize your modifications and return to the choice groups management page.
Click on the edit button to the right of the desired combo.
Click on Edit to reach the combo modification page, then click on Save once your modifications have been completed to return to the combo management page.
To permanently delete the combo , click on the edit button and then on Delete .