Loading...
Loading...
Loading...
Loading...
Loading...
Loading...
Loading...
Loading...
Icon
Select the Icon you wish to be displayed.
Fit to size
Select this option for the icon to use the whole key space.
Format
Description
Enter the key description that will be displayed on the command key. You must have a description to display the key.
Font
Enable the font pattern you want to use for this command key. To know about the fonts available, please refer to the POS screen designer available from the Posera web site.
Wrap text
Enable this to use the two lines available for the key. Use a space character to separate the first to the second line description.
Alignment
Bottom align
Enable this to display the key description from the bottom side of the key.
Left align
Enable this to display the key description from the left side of the key.
Top align
Enable this to display the key description from the topside of the key.
The Copy button from the Preferential Screens list allows any existing preferential screen to be copied to a new one. This is especially useful to quickly create multiple preferential screens based on a common model.
Click on an existing Preferential Screen to highlight it, and click this button to copy the highlighted Preferential Screen to a new preferential screen.
Description
Enter a name for this new preferential screen.
Button Layout
Button Appearance
Screen color
Choose an item from the list. To know about screen colors available, please refer to the POS Screen designer document available on Posera web site.
Graphic
Choose a graphic type from the list by clicking on the scroll button . To know about graphic type available, please refer to the POS Screen designer document available on the Posera web site.
3D Border
Enable this option to display a three dimensional border to the key.
Option
Bottom expand
Right expand
Select this to expand the key size including the right key space. If there is not key available on the right (you are editing a key of the most right column), this field wont be available.
Preferential Screen Setup
Screen Setup
Command Setup
Button Layout
Text Format
Icon Setup
Copy Preferential Screens
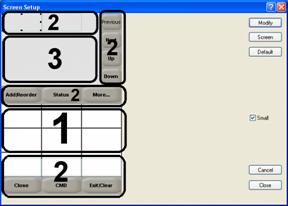
The Preferential Screen Setup option from the Screens menu allows to define the scrolling command area (SCA) of your preferential screen. Preferential screens are custom view pages of your revenue center.
From the grid, under the Scrolling Command Area (SCA), select the button you want to modify and click on the "Modify" button. You can also double click on the button to access the properties.
Click this button to enter the preferential screen description and dimensions.
When the Next button is used to reach next page of command buttons, select this button to go back to the previous section of command buttons.
If the number of buttons defined is greater then the number of buttons displayed, select this button to reach the next buttons.
Small
Enable this option to display the small device (hand held) preferential screen.
Click the Wizard button to automatically create preferential screen buttons from an existing variable list.
Click this button to copy the current standard preferential screen to the small preferential screen.
Click the Cancel button to discard changes and exit.
Click the Close button to save changes and exit.
Screen
Screen setup
Description
Enter description for this preferential screen.
Screen type
Select from the list, the pre-defined screen size for the preferential screen or select custom to enter other dimension you need.
Screen dimension
Number of rows
Enter the number of row you want to have for the selected screen.
Number of columns
Enter the number of column you want to use for the selected screen.
(Nbr of column + 1) * Nbr of row =< 50 and Nbr of column * (Nbr of row +1) =< 50
Preferential Screen Wizard
Click the Wizard button to access the Preferential Screen Wizard.
Variable List
From the drop-down list, select the variable list that will be used to automatically generate buttons on the preferential screen.
Copy to Small
Click the Copy to Small button to copy the current standard preferential screen to the small preferential screen.
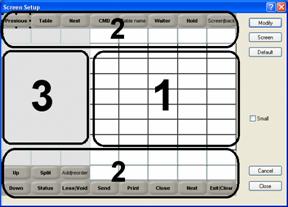
The Preferential Screen Setup option from the Screens menu allows to define the scrolling command area (SCA) of your preferential screen. Preferential screens are custom view pages of your revenue center.
From the grid, under the Scrolling Command Area (SCA), select the button you want to modify and click on the "Modify" button. You can also double click on the button to access the properties.
Command Setup
Command
Type
The commands are grouped under seven different types. Select the appropriate type to reach the desired command for this button.
Click to view the full Type List
Command
Select the command you want to apply to this button. Please refer to the following tables for the list of available commands.
Click to view the full Command List
Usage
Select a function for this button. See the following table for the different functions available for different buttons.
Click to view the full Usage List
Revenue Center
If you have selected an item, a mode, a preferential screen or a variable list in the Command field, you are able to call a screen from another revenue center.
Sorted
This option becomes available when commands like Variable list or Command list are selected from the Command drop-down list. Enable this option to sort the list according to the options selected in the variable list (Alphabetically, by priority or by external code) or command list (Alphabetically). If this option is disabled, the list will not be sorted. In the case of Variable list, this allows for custom button layouts to be created in variable list setup. For Command lists, this allows the commands to be displayed in the order they were set in the command list.
Fixed list
This option becomes available when commands like Variable list, Command list or Preferential screen are selected from the Command drop-down list. Enable this option to force the list to remain on the screen and allow multiple items to be ordered from it. Disabling this option will cause the list to close immediately after selecting one single item.
The Preferential Screen Setup option from the Screen menu allows to define the scrolling command area (SCA) of your preferential screen. Preferential screens are custom view pages of your revenue center.
The Order Screen is composed of 3 areas
A scrolling command area. A fixed command area. A scrolling history area.
We use the notion of grid to partition areas; a regular device uses a grid of 8x12 cells, while a small device will use a grid of 3x10 or 3x9 cells (need to be determined at usage). Area size will snap to these grids. Scrolling uses page-flipping notion only. Scrolling supports bi-directional flipping, or unidirectional flipping with rollover. The grid is just a general button layout helper. Buttons are allowed to not snap to this grid.
This area corresponds to the actual preferential screen notion. While the area as a fixed size, the number of buttons in this area is variable. The size of buttons will be adjusted to fit the complete area. Actually on a regular device there is a maximum of 50 buttons, on a small size device there is approximately 30 buttons (will need to be estimated at usage). Buttons have the possibility to expand to left, bottom or both. When a button expands to a direction, it will take over the area of the neighborhood button, which will be hidden.
These buttons can trigger orders or commands (same as the fixed command area).
Command to scroll this area can be contains in the SCA or in the FCA.
The SCA works with the FCA to compute his size. If a complete row of the FCA is hidden, the SCA will take over this area.
Contrary to the SCA, the buttons in this area have a fixed size. The only modification that is allowed is Right expand and Bottom expand. Other than that, they can only be displayed as shown. From the user's perspective, the number of buttons will also vary.
These buttons can trigger orders or commands (same as FCA).
We can estimate roughly 32 buttons for a regular device and 12 buttons for a small device.
This area can be sub-divided into 4 areas:
The header
The history order list
The footer
The fast quantity buttons
Only the order list is scrollable by page flipping. It contains the order information for the current table; orders already sent to the kitchen are displayed distinctly from new orders. The headers and footers contain information for the current table like the table number, the card, delivery time, actual total, and so on&
The size of the SHA will depend of the FCA. If a complete row of FCA is hidden, the SHA will take over this area. We will need about 2 lines for the header and 1 for the footer, the number of lines of the order list will vary to fit the rest of the SHA Command to scroll. This area can be contained within the SCA or in the FCA.
On small devices we will provide functionality to temporarily take over the full screen to see a long list of orders. Regular devices will provide the functionality to temporarily display previous order for food runners.
The SHA is also responsible to create the fast quantity buttons (if needed).
All buttons in these areas can trigger the same set of commands. These commands will be rich and easily modifiable.
A command can trigger a direct action, or display a list of commands.
The available commands can be:
All commands existing in the actual preferential screen (items, lists, preferential, screen, modifier, payment, and son on&).
All commands existing in the current order screen (print, up, down, send, close, and so on&).
All commands in the CMD button.
A list of previous mentioned commands.
Also the appearance of each button must be set individually like in the actual preferential screen. The user can change colors, fonts, bitmaps and icons.
All configurations for SCA and FCA are done on the Back-Office using a user-friendly graphical representation of the order screen as it appears on the POS. Because we want to make the process easy for the end user, and because the SCA and FCA correspond to two different concepts, the setup of SCA and FCA is separated. Small and Regular devices must be integrated as seamless as possible in the system. Only one set of SCA/FCA exists, and the system switches automatically for the end-user, depending on the device. So the detail of FCA/SCA is different between small and regular devices but the list of SCA/FCA is the same.