> For the complete documentation index, see [llms.txt](https://docs.maitredpos.com/llms.txt). Markdown versions of documentation pages are available by appending `.md` to page URLs; this page is available as [Markdown](https://docs.maitredpos.com/maitred/maitred-complete-online-documentation/chap-5-configuring-and-managing-work/mobile-pos/maitred-back-office-configuration/mobile-workstation-settings.md).
# Mobile Workstation Settings
Mobile POS workstations require some specific settings in Point of Sale Control > Workstation > Options.
### Access Workstation Options
1. Logon to the Maitre’D Back-Office with appropriate credentials. (Distributor or System Owner)
2. Start the Point of Sale Control module.
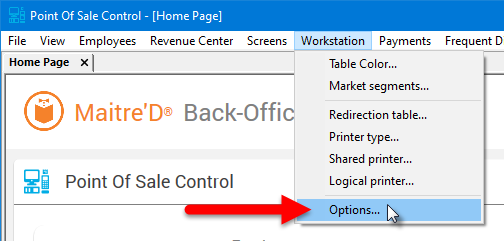
 3. Click on the Workstation menu and select the Options... option.
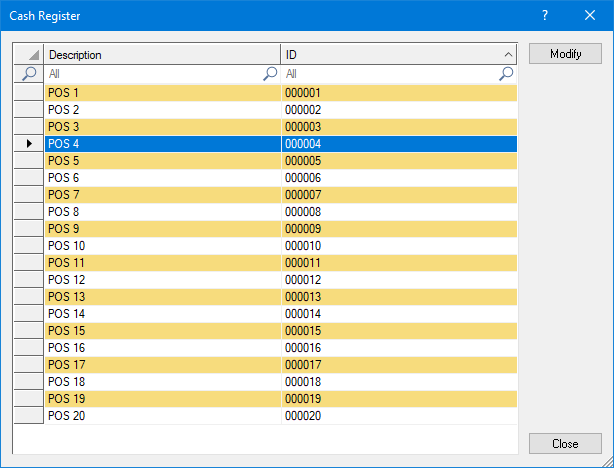
4. The list of available workstations will be displayed. Select the workstation for which will be used as a Mobile POS and click the Modify button.
5. The workstation's properties open on the Workstation branch.
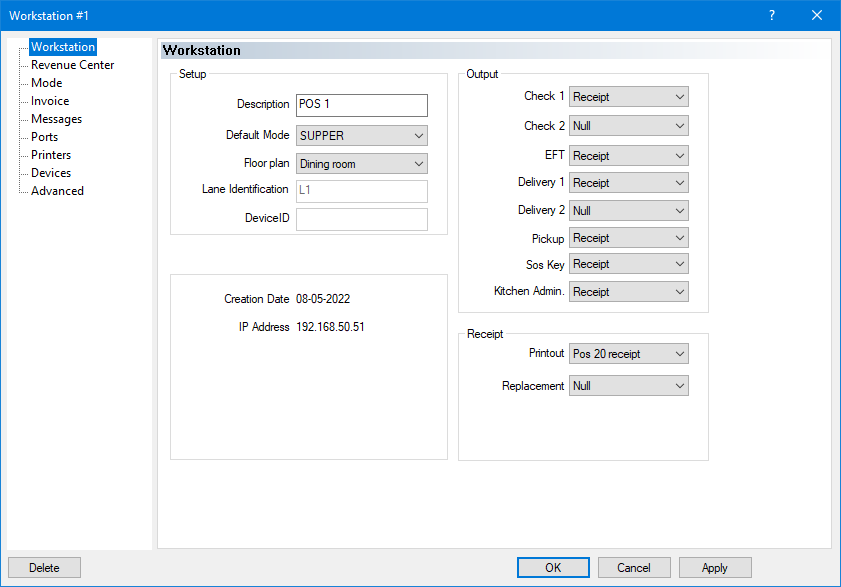
6. Since Mobile devices can't print on their own, set all Outputs and Receipt printouts to NULL.

7. In the Devices tab, make sure there are no devices setup. The device list should be empty.

8. Click on the Advanced tab.

#### Operating system
From the drop-down list, select the Mobile POS app option.
#### Dark Mode
Enable this option to use this mobile POS with the Dark user interface. If this option is disabled, this mobile POS will use the Light user interface.
{% hint style="info" %}
NOTE: Contrary to the Advanced User Interface (HTML POS), there is no toggle switch to change between Dark mode and Light mode on the Mobile POS app. This change can only be made from the Maitre'D Back-Office.
{% endhint %}
#### Reset Token

When the Mobile POS application connects to the Maitre'D Back-Office for the first time, a token is created to speed up subsequent connections. If you experience connection issues, resetting the token will delete the current connection token and force a new one to be created. This should resolve any authentication issues.
1. Once this mobile POS is configured, click OK to save changes and return to the list of workstations.
2. Repeat this process for all Mobile POS workstations.
Related Topics
1. [Setup Mobile Printing](/maitred/maitred-complete-online-documentation/chap-5-configuring-and-managing-work/mobile-pos/maitred-back-office-configuration/setup-mobile-printing.md)
2. [Mobile Workstation Settings](/maitred/maitred-complete-online-documentation/chap-5-configuring-and-managing-work/mobile-pos/maitred-back-office-configuration/mobile-workstation-settings.md)
---
# Agent Instructions
This documentation is published with GitBook. GitBook is the documentation platform designed so that both humans and AI agents can read, navigate, and reason over technical content effectively. Learn more at gitbook.com.
## Querying This Documentation
If you need additional information that is not directly available in this page, you can query the documentation dynamically by asking a question.
Perform an HTTP GET request on the current page URL with the `ask` query parameter, and the optional `goal` query parameter:
```
GET https://docs.maitredpos.com/maitred/maitred-complete-online-documentation/chap-5-configuring-and-managing-work/mobile-pos/maitred-back-office-configuration/mobile-workstation-settings.md?ask=&goal=
```
`ask` is the immediate question: it should be specific, self-contained, and written in natural language.
`goal` is optional and describes the broader end goal you are ultimately trying to accomplish on behalf of the user. GitBook uses it to tailor the answer towards what is most useful for that goal.
The response will contain a direct answer to the question and relevant excerpts and sources from the documentation.
Use this mechanism when the answer is not explicitly present in the current page, you need clarification or additional context, or you want to retrieve related documentation sections.
3. Click on the Workstation menu and select the Options... option.

4. The list of available workstations will be displayed. Select the workstation for which will be used as a Mobile POS and click the Modify button.

5. The workstation's properties open on the Workstation branch.

6. Since Mobile devices can't print on their own, set all Outputs and Receipt printouts to NULL.

7. In the Devices tab, make sure there are no devices setup. The device list should be empty.

8. Click on the Advanced tab.

#### Operating system
From the drop-down list, select the Mobile POS app option.
#### Dark Mode
Enable this option to use this mobile POS with the Dark user interface. If this option is disabled, this mobile POS will use the Light user interface.
{% hint style="info" %}
NOTE: Contrary to the Advanced User Interface (HTML POS), there is no toggle switch to change between Dark mode and Light mode on the Mobile POS app. This change can only be made from the Maitre'D Back-Office.
{% endhint %}
#### Reset Token

When the Mobile POS application connects to the Maitre'D Back-Office for the first time, a token is created to speed up subsequent connections. If you experience connection issues, resetting the token will delete the current connection token and force a new one to be created. This should resolve any authentication issues.
1. Once this mobile POS is configured, click OK to save changes and return to the list of workstations.
2. Repeat this process for all Mobile POS workstations.
Related Topics
1. [Setup Mobile Printing](/maitred/maitred-complete-online-documentation/chap-5-configuring-and-managing-work/mobile-pos/maitred-back-office-configuration/setup-mobile-printing.md)
2. [Mobile Workstation Settings](/maitred/maitred-complete-online-documentation/chap-5-configuring-and-managing-work/mobile-pos/maitred-back-office-configuration/mobile-workstation-settings.md)
---
# Agent Instructions
This documentation is published with GitBook. GitBook is the documentation platform designed so that both humans and AI agents can read, navigate, and reason over technical content effectively. Learn more at gitbook.com.
## Querying This Documentation
If you need additional information that is not directly available in this page, you can query the documentation dynamically by asking a question.
Perform an HTTP GET request on the current page URL with the `ask` query parameter, and the optional `goal` query parameter:
```
GET https://docs.maitredpos.com/maitred/maitred-complete-online-documentation/chap-5-configuring-and-managing-work/mobile-pos/maitred-back-office-configuration/mobile-workstation-settings.md?ask=&goal=
```
`ask` is the immediate question: it should be specific, self-contained, and written in natural language.
`goal` is optional and describes the broader end goal you are ultimately trying to accomplish on behalf of the user. GitBook uses it to tailor the answer towards what is most useful for that goal.
The response will contain a direct answer to the question and relevant excerpts and sources from the documentation.
Use this mechanism when the answer is not explicitly present in the current page, you need clarification or additional context, or you want to retrieve related documentation sections.