Time table /Schedule setup
Last updated
Last updated

This module allows to set up to 30 time periods. For each time period you can set up the starting and ending hours for the Labor Distribution Report.
Description
Enter a name that represents the period of time you would like the labor distribution report to print. Suppose you wanted to know Labor Distribution figures for 11:00 AM - 4:00 PM, which is the lunch period. You would enter "lunch" or "period 1" for the Description. The description can be a maximum of 20 characters.
Start Hour
Enter the starting hour for the time period. In the example above, you would type "11:00. Do not type the colon.
End Hour
Enter the ending hour of the time period. In the example above, you would type "16:00". Do not type the colon.
This setup option allows to easily setup and visualizes all employees' schedules within a visual interface. A color legend at the bottom of this screen shows which color corresponds to which task.
This button, in the top left corner, switches from seeing employees by name to seeing them by employee code, and vice versa.
This button switches to an enlarged view of the schedule with one day per screen.
This button reverts to a compressed view of the schedule with one week per screen.
Drag and drop
Right clicking on the extreme left or right of an existing shift of an employee allows to drag the beginning or end time of that scheduled shift, down to a minimum of 1 hour or up to a maximum of 12 hours.
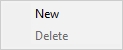
Right clicking on an empty area of the schedule of an employee brings up this contextual menu.
New
The New option of this contextual menu allows to add a new shift in the schedule of that employee.
Delete
The Delete option of this contextual menu removes an obsolete shift from the schedule of that employee.
Date
Enter the date the schedule begins. Maitre'D automatically figures out the day of the week.
Begin
Enter the time the employee begins this task (24 hours format).
End
Enter the time the employee ends this task (24 hours format).
Task
Click the Drop Down arrow to select from a list of available tasks for the employee. The employee must first have been assigned the necessary tasks under Time & Attendance / File / Employee / Assigned Tasks.
Automatic
The Automatic Field only works for employees with the Supervisor option enabled in their file. If this option is enabled, the employee does not have to punch in and punch out on the touchscreen workstation. Maitre'D automatically generates the schedule according to the work schedule every week. If this option is disabled, the employee has to punch in and punch out in order for the system to calculate the working hours, but the system can correct the time according to the schedule. For more information on the punch corrections the system brings up when using the work schedule, see the Use Schedule field in the Options section.